RandAugment: Choose Augmentations with Two Parameters
On this page
- What N and M Control
- What the Papers Report
- Build a RandAugment-Style Policy
- How This Recipe Differs from a Reference Implementation
- Tune It Without Losing the Baseline
Use RandAugment when you want to try a varied training augmentation policy without tuning every transform separately. You choose how many operations to apply and a shared strength setting. Albumentations provides the selection mechanism through RandomOrder; the example below supplies the operation pool and strength mappings.
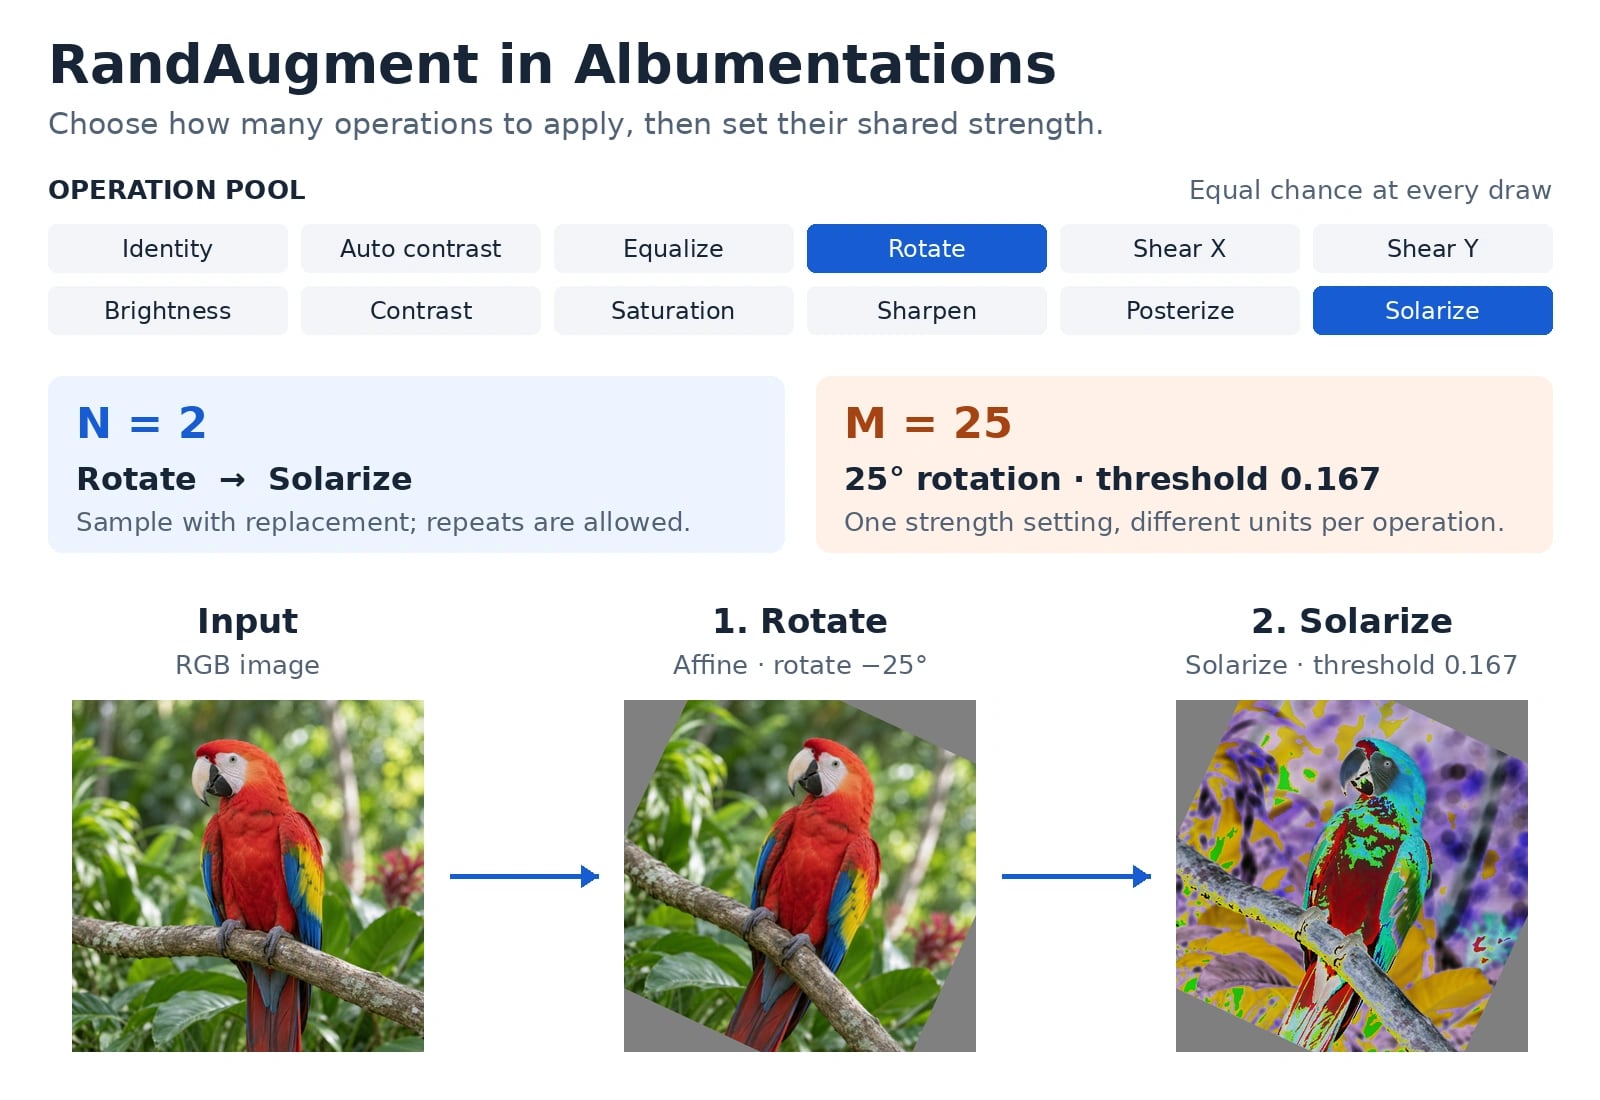
N chooses the number of operations; M sets their strength. This sampled Rotate → Solarize pair at M=25 was chosen to make both stages easy to see: first the image rotates, then solarization alters its colors. The next image gets a fresh draw from the same pool. Repeated operations are allowed, and the selected operations run in the order drawn. The input image was generated with an image model; every augmented view was produced by Albumentations.
What N and M Control
RandAugment samples N operations uniformly, with replacement, and applies them sequentially. Each operation receives the same magnitude M, translated into its own units: degrees for rotation, a pixel threshold for solarization, and so on. A repeated selection applies the operation again. N and M are tuned on validation data; the method removes AutoAugment's separate policy search on a smaller proxy task. See Cubuk et al., NeurIPS 2020, Section 4.
For example, with N=2, one image might receive rotation followed by contrast adjustment. The next might receive contrast adjustment twice. The input label must remain valid for both outcomes.
M is an index into a chosen strength scale. It is not a probability, and equal values across implementations need not produce equal distortions. For example, torchvision's implementation uses 31 magnitude bins and separate mappings for each operation.
What the Papers Report
These are published training results, not measurements of the Albumentations example below.
Original RandAugment Results
Selected results from Cubuk et al., Tables 2–4:
| Dataset and model | Metric | Baseline | AutoAugment | RandAugment |
|---|---|---|---|---|
| CIFAR-10, Wide-ResNet-28-10 | Accuracy (%) | 96.1 | 97.4 | 97.3 |
| CIFAR-100, Wide-ResNet-28-10 | Accuracy (%) | 81.2 | 82.9 | 83.3 |
| ImageNet, ResNet-50 | Top-1 accuracy (%) | 76.3 | 77.6 | 77.6 |
| ImageNet, EfficientNet-B7 | Top-1 accuracy (%) | 83.7 | 84.3 | 84.7 |
| COCO, RetinaNet / ResNet-101 | mAP | 38.8 | 40.4 | 40.1 |
Baseline means the paper's existing augmentation recipe. CIFAR experiments already included flips, pad-and-crop, and Cutout. Table 2 averages ten runs; the COCO models trained for 300 epochs from scratch. AutoAugment's detection pool also included specialized box operations. RandAugment was competitive here, with gains depending on the task and model.
A Later Comparison: TrivialAugment
Müller and Hutter, ICCV 2021 compared augmentation methods in a shared training setup. Their TrivialAugment selects one operation and samples its strength anew for each image. Table 4 reports these test accuracies for Wide-ResNet-28-10:
| Dataset | RandAugment reproduction | TrivialAugment, same operation and strength space |
|---|---|---|
| CIFAR-10 | 97.12 ± 0.14% | 97.46 ± 0.09% |
| CIFAR-100 | 83.10 ± 0.32% | 83.54 ± 0.12% |
Values are means with 95% confidence intervals over ten runs. The authors reused published RandAugment settings and did not recover all its original scores. See Section 4.1.2 and Table 4.
Treat these results as reasons to evaluate a policy on your task. They do not establish a universal winner or predict the gain from swapping augmentation code in an otherwise different training recipe.
Build a RandAugment-Style Policy
The following recipe uses 12 operation types and an explicit magnitude scale from 0 to 30. It implements uniform selection with replacement, random order, and a shared magnitude using existing components. It is a documented adaptation: horizontal and vertical translation are omitted from the original 14-operation pool because random cropping already provides framing variation in the surrounding training recipe. Further differences from reference implementations are described below.
The inputs are RGB uint8 images. Install with pip install albumentationsx, and use the current parameter names shown here; the example was checked with version 2.4.3.
Define the Strength Scale
Let strength = magnitude / 30. The following mappings belong to this recipe:
| Operation | Albumentations component | Mapping |
|---|---|---|
| Identity | NoOp | Leave the image unchanged |
| Auto contrast | AutoContrast | method="pil"; independent of M |
| Histogram equalization | Equalize | mode="pil"; independent of M |
| Rotation | Affine | Either sign of 30 * strength degrees |
| Horizontal / vertical shear | Affine | Either sign of degrees(atan(0.3 * strength)), one axis at a time |
| Brightness / contrast / color saturation | ColorJitter | Factor 1 - 0.9 * strength or 1 + 0.9 * strength, one effect at a time |
| Sharpness | Sharpen | Kernel sharpening with fixed alpha = 0.5 * strength |
| Posterization | Posterize | Keep round(8 - 4 * strength) bits; use identity when this is 8 |
| Solarization | Solarize | Fixed normalized threshold 1 - strength |
Construct the Operation Pool
For signed operations, OneOf chooses between two fixed values with equal probability. Using a range such as rotate=(-angle, angle) would also sample smaller angles, changing the magnitude distribution.
import math

import albumentations as A
import cv2


def randaugment(n: int = 2, magnitude: int = 9) -> A.RandomOrder:
    if n < 1 or not 0 <= magnitude <= 30:
        raise ValueError("Use n >= 1 and a magnitude between 0 and 30.")

    strength = magnitude / 30
    shear = math.degrees(math.atan(0.3 * strength))
    bits = round(8 - 4 * strength)
    threshold = 1 - strength

    def signed(factory, amount):
        return A.OneOf([factory(-amount), factory(amount)], p=1.0)

    def affine(**kwargs):
        return A.Affine(
            **kwargs,
            interpolation=cv2.INTER_LINEAR,
            border_mode=cv2.BORDER_CONSTANT,
            fill=128,
            p=1.0,
        )

    def color(parameter, amount):
        ranges = {
            "brightness_range": (1.0, 1.0),
            "contrast_range": (1.0, 1.0),
            "saturation_range": (1.0, 1.0),
            "hue_range": (0.0, 0.0),
        }
        ranges[parameter] = (1 + amount, 1 + amount)
        return A.ColorJitter(**ranges, p=1.0)

    operations = [
        A.NoOp(p=1.0),
        A.AutoContrast(method="pil", p=1.0),
        A.Equalize(mode="pil", p=1.0),
        signed(lambda v: affine(rotate=(v, v)), 30 * strength),
        signed(lambda v: affine(shear={"x": (v, v), "y": (0, 0)}), shear),
        signed(lambda v: affine(shear={"x": (0, 0), "y": (v, v)}), shear),
        signed(lambda v: color("brightness_range", v), 0.9 * strength),
        signed(lambda v: color("contrast_range", v), 0.9 * strength),
        signed(lambda v: color("saturation_range", v), 0.9 * strength),
        A.Sharpen(
            alpha_range=(0.5 * strength, 0.5 * strength),
            lightness_range=(1.0, 1.0),
            method="kernel",
            p=1.0,
        ),
        A.NoOp(p=1.0) if bits == 8 else A.Posterize(num_bits=(bits, bits), p=1.0),
        A.Solarize(threshold_range=(threshold, threshold), p=1.0),
    ]
    return A.RandomOrder(operations, n=n, replace=True, p=1.0)
Every operation and nested composition has p=1.0, so all N selections execute. Identity still counts as an operation. Each signed pair occupies one slot in the outer pool, preserving equal selection probability across the 12 operation types.
Keeping all eight bits is an identity operation. The example uses NoOp for that case because Posterize accepts bit counts from 1 to 7.
Keep replace=True to allow repeats. SomeOf sorts selected operations into their original list order; RandomOrder retains their sampled order. Brightness adjustment followed by solarization can produce a different image from solarization followed by brightness adjustment.
Preview the Effect of M
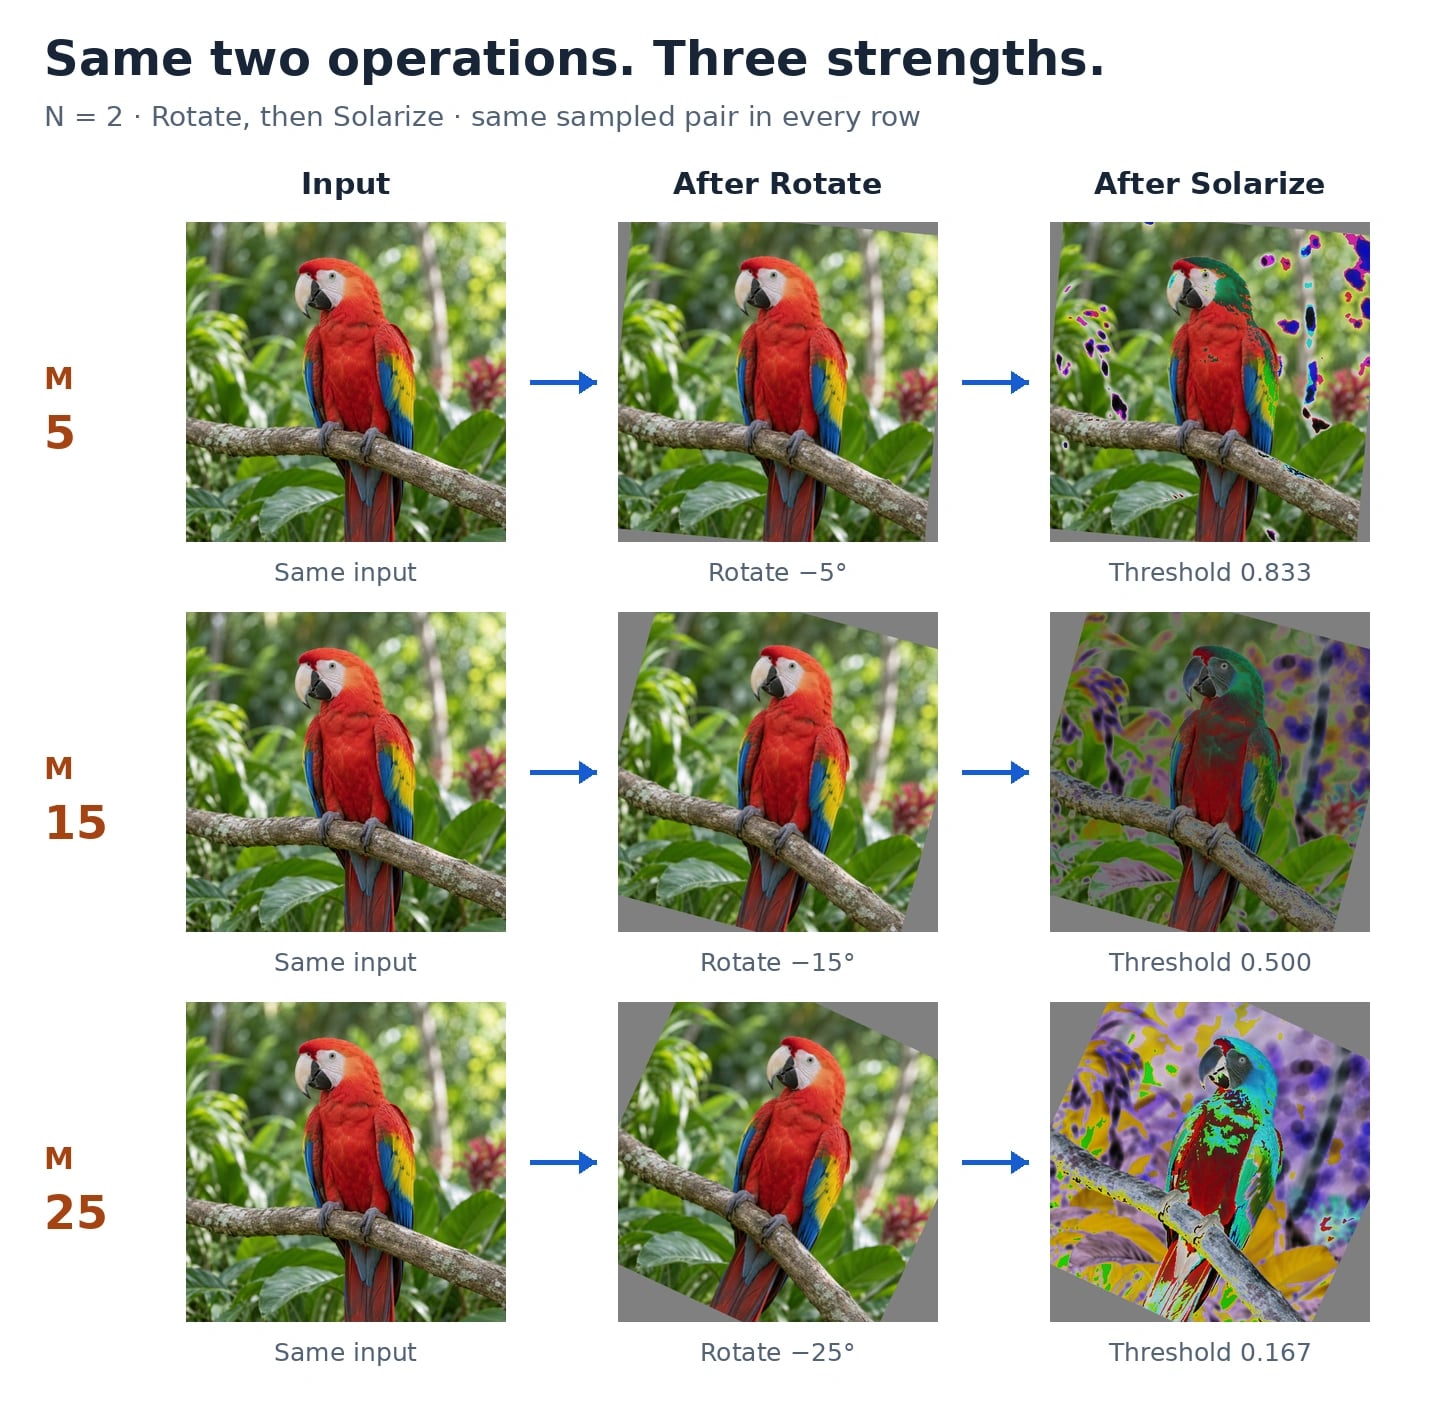
Read each row from left to right: input, first operation, second operation. Read down a column to see what changes when M increases while the input and sampled operations stay fixed. Rotation tilts the bird and branch and introduces gray fill at the edges. Solarization inverts channel values above its threshold. As M increases, the angle grows and the threshold falls, changing more of the image's colors.
Like Figure 2 in the RandAugment paper, this figure exposes the intermediate image after each operation. The source image was generated for this guide, and all transformations come from the Albumentations recipe on this page, before normalization. Each row uses the same 480 × 480 RGB image and the twelfth call to a fresh A.Compose([randaugment(n=2, magnitude=M)], seed=137). This call selects Rotate → Solarize with the same rotation sign at all three magnitudes. These examples show the recipe's behavior; they are not recommended settings for specific models.
Apply It During Training
After defining randaugment, read an image and insert the policy between your spatial preprocessing and normalization:
image_bgr = cv2.imread("image.jpg")
if image_bgr is None:
    raise FileNotFoundError("Place an RGB photograph at image.jpg.")
image = cv2.cvtColor(image_bgr, cv2.COLOR_BGR2RGB)

train_transform = A.Compose(
    [
        A.RandomResizedCrop(size=(224, 224), scale=(0.5, 1.0), p=1.0),
        A.HorizontalFlip(p=0.5),
        randaugment(n=2, magnitude=9),
        A.Normalize(),
    ],
    seed=137,
)
augmented_image = train_transform(image=image)["image"]
RandomResizedCrop and HorizontalFlip form the surrounding training recipe; they are outside the N-operation count. Normalize runs last. Add your framework's tensor conversion afterward if needed. Keep random training augmentation out of the clean validation pipeline.
Construct the pipeline once and call it for successive samples. Recreating it with the same seed for every image restarts its random sequence. See Reproducibility.
How This Recipe Differs from a Reference Implementation
This example demonstrates how to assemble the policy. It has not been trained to reproduce the paper's scores.
- Sharpness: this recipe uses kernel sharpening. Pillow-style sharpness enhancement can also soften an image; the operators and strength scales differ.
- Geometry: this recipe uses bilinear interpolation, a gray fill value of 128, and centered affine operations. Reference implementations can use different interpolation, fill, and shear origins.
- Magnitude: the mappings above are explicit choices. A shared
M=9does not guarantee the same pixel changes as TensorFlow, torchvision, or timm. - Zero magnitude: equalization and auto contrast remain active because they have no magnitude parameter. For a baseline without this policy, remove the
randaugment(...)block.
For a paper reproduction, match its implementation, operation pool, strength mappings, image resolution, preprocessing, and training settings. For an application, keep this recipe fixed while evaluating N and M.
Tune It Without Losing the Baseline
Start with a baseline that uses your existing crop, flip, and normalization. As a small initial comparison for this recipe, try N=2 with M=5, 9, and 15, then vary N if the result justifies more runs. These are suggested trial settings, not measured optima.
Inspect transformed images before training. Remove color operations if color determines the class, and restrict geometry when it changes the label or removes the relevant object. Strong solarization and posterization serve as Stress augmentation: their value depends on preserving the label while making the task harder.
Keep the split, model, training schedule, and other regularization fixed. Save each candidate as a separate configuration with its operation pool, N, M, package version, and validation result. Changing the pool also changes selection probabilities, so record that as a different policy.
The runnable example targets classification. For segmentation or detection, pass masks or boxes through the same Compose, configure target handling, and inspect transformed annotations. See Semantic Segmentation, Bounding Boxes, and Choosing Augmentations.